Retouch (New Picasa 3 Tool)
If you have ever wanted to remove a spot or blemish from a face in a photo, this is the tool for you. It works on the same cloning principles used in PhotoShop or Paint Shop Pro - but it's a heck of a lot easier and more intuitive to use.
Basically, all you need to do is click on the area you want to remove/alter in your picture, then click on another part of the same image to replace it. The funky thing is that Picasa then has a quick whizz at blending the edges of the new area with the existing image, then "Hey Presto", job done.
It's certainly not on a par to the perfection that you can manage with PS, but it is pretty remarkable nonetheless.
One other application for this tool...
You can have fun placing eyes onto foreheads, removing noses, getting rid of basically anything. Just experiment and have fun.
Picasa 3 is here!
With details being leaked out already as to whats included (including auto-facial recognition) and better indexing and searching, it's bound to get millions of hits in the first few hours of being made available.
Head on over to http://picasa.google.com/ for more details.
Click here for the download: Picasa 3 (Beta)
Creating Collections
Labels:
Tutorial
·


Doing it this way makes it a lot easier to sort through pictures because now you can simply go to the collection and you’ll have only those folders listed in order of date without having to sort through all the other folders you might have around that same date!
To create a new Collection, choose one of the folders in the left panel and right click on it. Choose Move To Collection and then choose New Collection.
Enter a name for your collection and click OK. Picasa will automatically move that folder into the new collection which looks just like the other sections, and which you can scroll down to see.
And that’s it! Now you can start organizing your files better and making them easier to search. Let’s say you create a collection called Business Pictures and you want to see pictures you’ve taken for your business recently. Just go to the search box at the top and type in business and all your pictures from that collection will show up.
Another cool thing you can do, which I just learned is to create a password to protect a collection! So if there are sensitive pictures you have, then you really should create a collection and password protect that collection. Simply right click on the collection header and you’ll see the option “Add/Change Password”. Enter a password and verify it and now you have a password protected collection of pictures. Remember though that the pictures can still be viewed if you go through Windows Explorer.
Any questions, post a comment!
Tags: Collections
Creating a Movie
Labels:
Tutorial
·
In Picasa, select a folder or album from the right hand pane first.
Once you select the folder, go to Create from the top menu and choose Movie.
On the Create Movie options screen, you can choose the amount of delay you want between pictures. The default 1 second I find to be very fast and you don’t really have enough time to see anything! I found 3 seconds to be ideal for me without being too long. However, if you’re planning on creating a movie of 300 pictures, 1 second might be just fine or else it might get too long.
I also found 320×240 movie size to be too small and grainy. The large size gave a much better picture than small and was not significantly lower in quality than Widescreen. The major difference is in the size of the files depending on whether they are compressed or uncompressed. I created some test movies with various options and I’ll give the results out of those below.
On the Video Compression dialog, you will have an option of Full Frames (Uncompressed) or several other compression methods. I chose DivX 6.0 Codec because it gave me extremely small files or high quality on my tests. Click OK and Picasa will create your movie and open the folder where the movie was saved to.
Here are the results of creating a movie from 10 pictures taken by a Sony DSC-N2 8MP digital camera, with 3 second delay between pictures and DivX compression:
Small: Uncompressed: 220 MB, Compressed: 3.04 MB
Large: Uncompressed: 883 MB, Compressed: 3.13 MB
Widescreen: Uncompressed: 1.94 GB, Compressed: N/A
As you can see from the table, you’ll definitely need to compress if you want to be able to share these movies with anyone! But the DivX compression was very impressive bringing the file size down from 883 MB to 3.13 MB! And there wasn’t very much difference between the compressed files for small and large. I wasn’t able to get the program to create a file for me for Widescreen compressed because of an error, but once I get that I’ll update the post.
Once you have your file, you can go to Picasa and right click the video and choose Upload to Web Album. If you use YouTube, you can post your video there and share it. Or if you use MySpace, you can create the video and then post the video by clicking on Videos under your picture:
And then click the Upload tab and fill out the form to upload your video!
Once uploaded, you can share the link with your friends and family.
Full Page Manual Slideshow, Scroller
Labels:
tip
·
- In "normal" view (folders on the left and thumbnails on the right)
- Hover your mouse over any thumbnail in any folder
- Press and hold "Alt Gr" (right hand side of you keyboard space bar) and
- Scroll your mouse wheel or
- Press the left & right arrows keys on the keyboard
- (remember to keep the "Alt Gr" key pressed)
This allows you to scroll fullscreen through the contents of the folder!
You do NOT need to click on the thumbnail or folder, just hover on it.
PiPiView 1.1
Labels:
"picture pile" pipiview
·
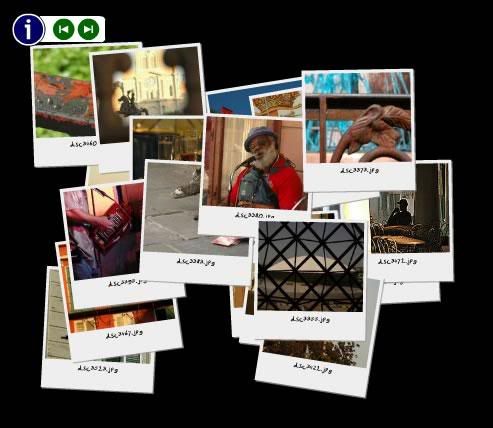
PiPiView is a free Interactive Picture Pile Viewer for Picasa2.
The original Picture Pile Collage of Picasa is pretty cool but the result is only a single jpeg montage, so not really usefull.
PiPiView is an interactive version of the Picture Pile which runs separately from Picasa. It's a viewer built in Flash MX 2004 and it enables you to browse through the photos, click and drag them around and to zoom in on them by a single click.
If you click on a photo with the CTRL-button hold down at the same time the web browser opens the original JPG in a new window. You can use the mouse or the left/right arrows on your keyboard. Drag the photos to move them to an other place. You can use the viewer as a stand-alone program but since its built in Flash it's ideal to place it on your website or weblog, you can even create a Windows Desktop picture pile and move the images around under your desktop icons!
PiPiView uses the same way of 'refining' as Picasa does. When you zoom in on a picture it first enlarges the thumbnail and at the same time it starts downloading the fullsize (a little bar shows the progress while downloading). When the fullsize is loaded the enlarged thumbnail is replaced by the sharp fullsize.
You can see an actual sample working here: mikedelgaudio.com
Download the zip file from here: PiPiView 1.1 in zipped format
Here's the info from the enclosed Read~Me file:
PiPiView - Interactive Picture Pile Viewer for Picasa2
Copyright (c) 2005 by Rick Companje
Website: http://pipiview.companje.nl (website down)
Email: pipiview@companje.nl
Version: 1.1
Date: 2005-07-22
-------------------------------------------------------------
PiPiView is a free Interactive Picture Pile Viewer for Picasa2.
The original Picture Pile Collage of Picasa is pretty cool but the result is only a jpeg, so not really usefull.
PiPiView is an interactive version of the Picture Pile which runs separately from Picasa. It's a viewer build in Flash MX 2004 and it enables you to browse through te photos and to zoom in on them by a single click. If you click on a photo with the CTRL-button hold down at the same time the web browser opens the original JPG in a new window. You can use the mouse or the left/right arrows on your keyboard. Drag the photos to move them to an other place.
You can use the viewer as a stand-alone program but since is build in Flash it's ideal to place it on your website or weblog.
PiPiView uses a kind of the same way of 'refining' as Picasa does. When you zoom in on a picture it first enlarges the thumbnail and at the same time it starts downloading the fullsize (a little bar shows the progress while downloading). When the fullsize is loaded the enlarged thumbnail is replaced by the sharp fullsize.
The font used in PiPiView is my own handwriting, you can use it for free!
Install PiPiView (only once)
----------------------------------------------------------------
- Have Picasa2 installed
- Download pipiview11.exe
- Run the self-extraction file pipiview10.exe
- Extract the files to the Picasa2 web template directory (normaly: c:\programfiles\picasa2\web\templates\)
- The folder 'pipiview' has now being created there
- Alternatively, copy the complete extracted pipiview folder and contents into the above directory
Create a PiPiViewer:
----------------------------------------------------------------
- Start Picasa2
- Select multiple files in one folder or label (no maximum of pictures but keep under 40 for the best results)
- Right click on the folder or label and choose for 'Make a Webpage...'
- Choose the size of exported pictures (640 will do)
- Enter a Page Title (here seems to be a little bug in Picasa)
- Select folder where to save the files
- On the next screen select the 'Picture Pile Viewer (PiPiView)' template
- Finish will start the export of images, thumbs and viewer.
- When the export finishes Picasa will open index.html in your web browser
- You can now upload it to your website
Using the viewer:
----------------------------------------------------------------
- Use the green arrow buttons to browse through the photos. PiPiView will zoom in on the next picture.
- Press the blue information button to view the infoscreen
- Click on a thumbnail-photo to zoom in on that one. Click again to change it back to its original size and position.
- Click on a photo with the Control button down to open the original JPG in a new window.
- Drag a picture to move it to another place.
Customize a PiPiViewer
----------------------------------------------------------------
- The default size for the viewer is 500x400 pixels, but you can easily edit the generated html-code and scale it to 400x320 or bigger to 600x480 for example.
- You can edit the background color of the viewer in the html-code. Find the bgcolor (in the object and embed tag) and change it to the color you want.
- Change the datafolder in the querystring to point to the location of your image files. Do this when your html-file and/or your swf are on an other place than your images. The default datafolder is ./ but you can change it for example to datafolder=./photos/holidays/france/
Version History:
----------------------------------------------------------------
Version 1.1 @ 2005-07-22:
- The green buttons were added to browse through the pictures with the mouse
- Rick's free font added, my own handwriting
- Some layout adjustments (borders, shadows)
- Show infoscreen for N seconds (pipiview.swf?info=N)
Version 1.0 beta @ 2005-07-01
- first public release of PiPiView
- supports dragging and dropping photos
- Keyboard navigation (spacebar, left, right)
- Control + Click to open image in new web-browser window.
----------------------------------------------------------------
This work is licensed under a Creative Commons Attribution-ShareAlike 2.0 Netherlands License. (http://creativecommons.org/licenses/by-sa/2.0/nl/)
Effective Portraits
1. In the "Effects" tab select GLOW and press ok without changing any settings
2. Select SHARPEN and press ok without changing any settings
3. Select SOFT FOCUS and choose where you want the focus and size to go...
This is a great effect for portraits and works really well with lower light/high grain images.
Doubling the effect
Labels:
Tuning
·
However, it is possible to redo the "Tuning" effects more than once until you achieve the effects you desire.
How?
It's pretty simple really.
Choose an image, select it and go into the "Edit" mode.
Select the "Tuning" tab.
Slide any of the Highlight, Shadow or Fill Light fully to the right.
Click on the Basic Fixes tab, then
Select the "Tuning" tab and you will be able to redo any of the Highlight, Sadow or Fill Light sliders fully again.
Here's an example of a full colour image, converted to Filtered B&W and then 150% Highlighted and 150% Shadow - to create a high-key effect.
Focal Black & White
Well, here's a great technique by "Mushroom and Gadgets" that may be able to resolve that:
- Choose a suitable image
- Go to the "Effects" tab and select "Focal B&W"
- Choose the area you want to remain in colour and click "Apply"
- Export the changed image to a new folder on your desktop
- Go back to the original image and select a new focal point, then export this as before.
- When you have done all the focal points you want to do, find the exported images folder in Picasa
- Select all the individual images and click the "Collage" button at the bottom of Picasa
- Choose the "Multi-Exposure" option and you should see all the images combined with various focal points still in colour
Full Screen Image Preview
Labels:
tip
·
It's normally the key to the immediate right of your space bar.
Additionaly, if you are in Folder View (folders on the left and thumbnails on the right) you can use the arrow keys on the keyboard or scroll wheel on your mouse (while pressing Alt Gr) to scroll through the images in the folder.
Perfecting White Balance
Labels:
tip
·
Luckily, Picasa has a great tool for adjusting this and it's quick and easy to do.
Here we go:
- Select an image
- Click the "Tuning" tab
- You will see an option to use a "Neutral Colour Picker" (aka White Balance)
- Click the eye dropper to start
- Click on the image where it should be white (or 50% grey)
- You will see the colours change (if you are happy with this then you are finished)
- The eye dropper will close
Search by Colour
Labels:
tip
·
...but Picasa has a trick in store! You can search for an image by it's colour instead.
To do this simply:
- Click on "Tools"
- Click on "Experimental"
- Click on "Search for..."
- Then choose your colour
Cool huh?
You can experiment yourself and see what colours you can use by typing colour names and codes after the "color:" search text.
Square Crop
Labels:
tip
·
It's easy peasy!
Simply do this:
- Select the "Basic Fixes" tab
- Click the "crop" button
- Select the "manual" option
- Hold down the "shift" key on your keyboard and
- Drag your mouse over the image
Here's a sample:

Filtered Black & White
Labels:
Filtered BW
·
Essentially it allows you to convert a color image to black and white, simulating the use of a coloured filter in front of the lens.
The filters can be thought of in extremes:
- Red - softens and lightens skin tones
- Green - darkens skin tones, enhances skin pigmentation
To apply the Filtered B&W tool, simply click the "Effects" tab and choose "Filtered B&W". You can either use the preset colours available or use the colour box to select an individual colour.
Why choose this instead of the normal "B&W" tool?
Well, the standard B&W conversion can leave you with a flat, grayscale image - whereas the Filtered conversion can give you an image with more depth and clarity.
Here's one of my favourite images that I used the red filter for:

Subscribe to:
Posts (Atom)

